The mid-season blossoms were sparse due to a late cold spell, which I'm sure was mother nature's revenge for those early weeks of warmth.
I only have two late season trees, and they tried so hard to set blooms, but just didn't quite get there.
So what is normally a field of white and pink blossoms abuzz with flies and bees doing their busy work, swimming through air sickeningly sweet with perfume was silent.
While I cannot control the effects of the weather on the fruit trees, or when the bees decide to pry themselves out of bed, I can increase the number of bees on the property.
We are a registered state pollinator habitat and are on the DriftWatch and BeeCheck registry. We let as much native grasses and flowers grow on the property as we can and I have many areas where I have planted additional areas of flowering plants.
So after a great deal of research and decided that we would start by adding just one hive. I have a friend about 8 miles away who has traditional square box hives for honey. She grows fabulous flowers for the farmer's market, and she had a rough weather year too.
We decided we liked the eccentric look of the top bar hive. I actually began looking at them sometime last winter, but after seeing the price tag, and then being saddled with the barn project, I put the hive on such a back burner, I forgot about it. At the beginning of January, my renewal for the DriftWatch program popped up in my email. Suddenly, the beehive elbowed its way back into not only my memory, but forced it's way to the front of the project line. How long could building one take? Besides, I could work on the hive in the workshop when I got sick of working on the bathroom remodel in the house.
A quick Google search for Top Bar Hive Plans brought me to the site of The Barefoot Beekeeper .
He, in very plain English, explains not only beekeeping, but how the hives work. While his plans online are quite easy to follow, I did decide to go ahead and order his books to have on hand for reference. There a great resource for beekeeping for dummies. Because honestly, I have NO idea on what I'm doing with bees.
He discusses three main methods for keeping bees.
*Keeping bees just to have bees. Completely let them be and just give them a place to live.
*Being a mid-range keeper. Give the bees a place to live. Give them minimum maintenance, and take only the honey the bees won't themselves need for over wintering.
*Having bees for honey. These bees work hard, hives are heavily maintained and checked, and honey is harvested and bees have food given to them to overwinter.
We decided to go with being mid-range keepers. We'll care for them, but not hover. Their main job is pollinating and any honey we get is just a bonus.
 |
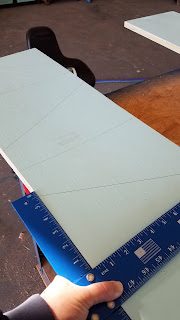
| marking out the sliding boards |
The instructions are quite good and the build went quite well. Like all projects I thought it would be a quick 2 or 3 hours. Turns out those are football hours, but they were easy hours, not at all confusing or difficult. The full instructions are online, so I won't go through them here. I'll just post the photos and comments.
 |
| These pieces are critical. They must match, and are what the angles of the sides are based on. Building around them makes the sliding boards fit like a glove. |
 |
| I painted all the pieces before cutting. This is much easier than painting all those little corners. |
 | |
|
The floor was also tricky. It can be solid, it can be micro mesh less than 1/8 of an inch square (not found in US, but you can use gutter screening, or what I opted for, an ECO-floor. An ECO-floor most closely resembles the litter floor of a tree stump or rotted log. The tiny mesh floor is covered in small twigs and shavings. It allows for the natural friends of the bees to move in and take care of dead bees and mites. This requires an add on to the bottom the hive that has to custom designed. It is made so that it is removable to be checked and cleaned. It is filled in it's entirety, so that the litter comes to the bottom of the slider boards. The litter is so thick that it is insulating and a barrier for those that would also like to move into the hive.
 |
| The ECO-floor frame shown here upside down. |
 |
| The feeding station for sweet water for food drought season. |
 |
| the new porch |
The bees themselves will be ordered next week from Valhalla Bee Farm, they carry both Italian and Carniolan bee boxes, as well as a well stocked room of beekeeping supplies. (There is nothing more glamorous than a full beekeeping getup.) While the Italians make more honey, the Carniolans are a "friendlier" bee. Since our goal isn't honey production, we plan on getting the Carniolans.
So that's the buzz at the Ranch this week.


I hope the hive is successful Caryl.
ReplyDeleteWoo-hoo Good luck with your beekeeping ventures
ReplyDelete