The best place for a chick, at least at my house, in under the butt of a broody hen. It just makes life SO much easier. She hatches the eggs, raises the chicks - teaching them to eat, dust bathe, navigate the hen house, roost, all the while protecting them from overly interested flock mates. She cold hardens them on their long walks, occasionally stopping to warm them or help them find food. The chicks grow up with the flock, finding their own place in the pecking order and just become one with the universe.
But as we have seen, sometimes we have chicks and no broody around for them.
Sometimes we have a broody who needs a quieter place to sit. As much fun as it must be for them to be sitting on and protecting eggs, while her flock mates decided to come and sit ON her and lay their eggs. Of course the constant probing hands under her to check for eggs that AREN'T hers, cannot be calming for her either.
ENTER the Little Lolly (the main hen house being Oodalolly)
Like thousands of great ideas before it, Little Lolly was born on a napkin.
The rough design was based on a complete piece of garbage coop we purchased from a local feed store during a chicken emergency in November of 14. We knew it was shoddy materials and design when we put it together. We also surmised that it wouldn't last a year. I swear it was made of balsa wood. The numbers of improvements and modifications we had to make just to make it chicken friendly and predator resistant was crazy. (I didn't say proof, as a 100 year old, blind, arthritic, toothless raccoon could get it without even trying.)
I honestly wish these companies would stop selling these things to people. It only sets them up for frustration and failure. They are cheap (but not cheap), far too small, and an open door for predation.
I digress.
I wanted something permanent. I wanted chicks OUT of my barn bathroom. (Not that they don't make for perfectly wonderful entertainment for longer visits to the loo.) Their dander, their incessant high pitched chirping, and let's be honest, their stink, was just not wanted in the bathroom.
I'd like to raise and sell chicks again, and I don't want to be constantly tripping on peepers on the way to the toilet.
Out came the pen and napkin. A few tweaks later, and a trip the best little lumber yard in the next town over and I had a pile of ply that fit in my truck, and dimensional lumber piled in the barn. This is the same time I had Flora playing "I want to hatch eggs, but don't want chicks". So I started immediately in hopes of getting the little family out of the grow out pen in the barn and into Little Lolly in the yard, so they could have their own space and get to know the flock. (Little did I know then that she would abandon the chicks.).
The first thing I had to do was pick a location. I had to find some place as level as possible on this hill, as I am not a huge fan of dealing with the run skirting and angled wood pieces. I found a space between the barn and the main coop and built a foot print box to help mark the location of the post holes and to check the area for level.
After the posts positions were marked, I dug holes set poles in concrete, and used the box footprint and a post level to get them as close to the correct final position as possible.
I let the concrete set for two days. I planted the garden and some more trees. All under the careful supervision of the hardworking crew one of which is apparently Zorro.
When the concrete had finally set, and it stopped raining, and the ground stopped being a slip and slide, I tackled the posts with a long, 4 foot level, to mark all of them at correct cut off location. Since this is a small structure, I went with treated 2x4s as the base posts instead of 4x4s.
Two quick coats of exterior paint in Valspar's True Teal to add an extra layer of protection.
I then measured, painted, and installed the top of the skirt (except on the gated side).
I used heavy, galvanized, hammer in, fence staples to attach the half inch hardware cloth, cutting it long enough so that it would have a 9 inch wide anti-dig skirt around the bottom of the run. This is secured with landscaping staples.
The coop floor was next. 3/4" CDX plywood with two coats of exterior paint on both sides. Your paint may say it is one coat coverage, it never is. Wood is thirsty and will suck up the first coat, leaving your project splotchy looking. Take the time to do two coats.
I secured this with exterior deck screws that were 2 inches long.
While I had full access to the whole coop floor, I cut the pop hole. I decided on 14"x10" and then framed it with 1x2 to keep the PDZ from falling out willy nilly.
The ramp is on a hinge, is covered with shingle, and has an eye on the end for a pull string. The first week of chick life, the ramp is up and they can live inside. After that, the door is down all the time to allow them to go in and out at will to and from the run. At a week old, they are old enough to get up and down the ramp and in and out of the coop.


This is the point in the project I started to feel numb. Last year's mega build was still fresh enough in my memory to trick my soul into KNOWING I COULD do it, but far enough away that I had forgotten how much work, how many sleepless night, how much money, and how much planning and physical labor it all was. Kind of like childbirth. With Flora having abandoned the chicks, I was still up against a clock of getting the chicks out of the pen in the bathroom, but the clock had slowed, as the escape artist hen was now locked solidly in Sing Sing. I also knew that dry cooler air for the week would end abruptly, and 80s and 90s, humidity, and thunderstorms were right around the corner. With that deadline looming, I went fishing.
It's amazing how just one evening away from a project can reset your sensibilities, your nerves, and your sanity.
The next day, I was off and running again.
The walls were built inside the barn. I started with the most complicated wall, the front wall. It has the window in it. I tried
Habitat for Humanity for a small window that could be opened, but alas, they had none this trip. The 1/2" plywood was painted with its exterior teal blue and interior color, which can best be describes as scrambled eggs.
Along the bottom edge, which will be attached to the floor with 2.5 inch screws, I cut and placed a painted 2x2". I placed a second one NEAR the top edge but not TO the top edge. If you place it at the top, the slanted top will not close. Attach the 2x2s to the plywood with 1 5/8 screws. Measure and cut additional 2x2s for the vertical inside end pieces.
Now it is time for the window. It's really easy as it doesn't need a frame for support due to its size. Using a screwdriver, remove the screen spline and the insect screen from the window.
We won't be using it. Sitting the back of the window on the wall where you want it to be, TRACE the window footprint with a good pen or pencil.
Using a drill or paddle bit, drill near the corners to allow room for your jig saw to start. Be sure to cut ON the line or just outside of it.
When you get to a corner hole, square it off with the saw blade. Test fit your window. Make sure you have the bottom edge of the window in the down position of your wall. It has the seep holes for rain and ice.
From the outside of your wall, gently drop the window in the hole and secure it with short screws to the plywood through the holes provided on the window.
Cut a piece of hardware cloth that is the size of the window panel plus about one inch to wrap around under the area that will be filled with the trim wood. Cut the corners off so that you don't get bulk at corner that will not allow the trim to fit.
Paint 1x3 or 1x4" pieces and cut to fit length and width of the window. Attach with short screws. Fill any corner gaps and screw holes with paintable caulking. Allow to dry and touch up the trim paint.
Attach the front wall to the floor using 2.5" deck screws. At this point, if you have to leave the project without surrounding support walls, add a scrap piece of angled wood to act as a temporary support.

The back wall basic construction is the same. The difference in in the ventilation holes and the system to operate it. It looks great and complicated, but is actually quite simple to build. A chicken can handle the cold. It's wearing a down coat. Chicks cannot handle the cold for long as they don't have anything but down for the first few weeks. When there's not a mother hen available, I use an electric broody plate which is far and away more safe than a heat lamp. The chicks quickly learn to duck under when they get chilly, just like they would a hen. Then they pop out to play. Rinse and repeat. Over time, they spend less and less time under the heat pad. But they still need ventilation, but not a draft. That said the back wall has a row of vent holes. The flow can be controlled by a sliding door.
To build this is easy. Just take your time. Figure out how long of a space your holes will take up and add 4 inches. That's how long your door slide piece will be. Make sure you have the room for that on your wall. The height of your slide will be the height of your holes plus 4 or 5 inches. I simply painted a 1x4 and a 1x2 and attached them with screws and created a frame on the back of the window, leaving one end open.
This is where you will slide the board in. Make sure the scrap of plywood you use is thin enough to slide freely in the slot. Add the 4th end. Caulk and paint the joints and screw holes. On the inside of the vent holes, inside the coop, use a staple gun to cover the holes with more hardware cloth.
On the back wall, I placed the 2x2 as I did on the bottom of the front wall, but on the top inside of the back wall I used a 2x4 as this will allow for a solid mounting for the roof hinges. Measure and add the vertical 2x2s on each interior end. Screw your back wall to the floor of the coop as you did the front.
Next is to create the end pieces. The front wall is 24" high, and the back wall is only 20" high. This allows for a gentle slope on the roof to shed rain. (6 feet long and 24 inches wide coop). To create the end, I measured across the bottom of the end piece, 24", checked the front height, and back height and cut the ply to match. Again I added a bottom and a near top 2x2. It does not need vertical 2x2s as you can screw the end ply pieces to the vertical front and back wall studs.
The roof is a 7 foot x 41" (how wide my SUV is). It is painted on both sides and attached with very large and heavy duty hinges. I purchased shingles from The Habitat for Humanity Re-Store for only a dollar a package. DEAL!
BUT WHERE IS THE DOOR?! The roof is the door! It is heavy, but a 2x2 on a hinge acts as a large, safe kickstand to hold it open. I may decide later to add a door on the side, but you wouldn't be able to access the whole interior from it, so I probably won't. With the roof open, I can access ALL of the interior.
After the roof was shingled. I added a drip edge (should have been first, BUT I had to find it in the store.) and I added a top edge to match the main coop. Painted 1x2s were added as trim to match the large coop, as well as a metal chicken silhouette, like the main coop.
The final step is to add the front gates. Measure the upper and lower opening and measure and cut 2x2 and using screws, toenail them in. To the bottom of the front skirting, using fence staples add hardware cloth digging barrier.
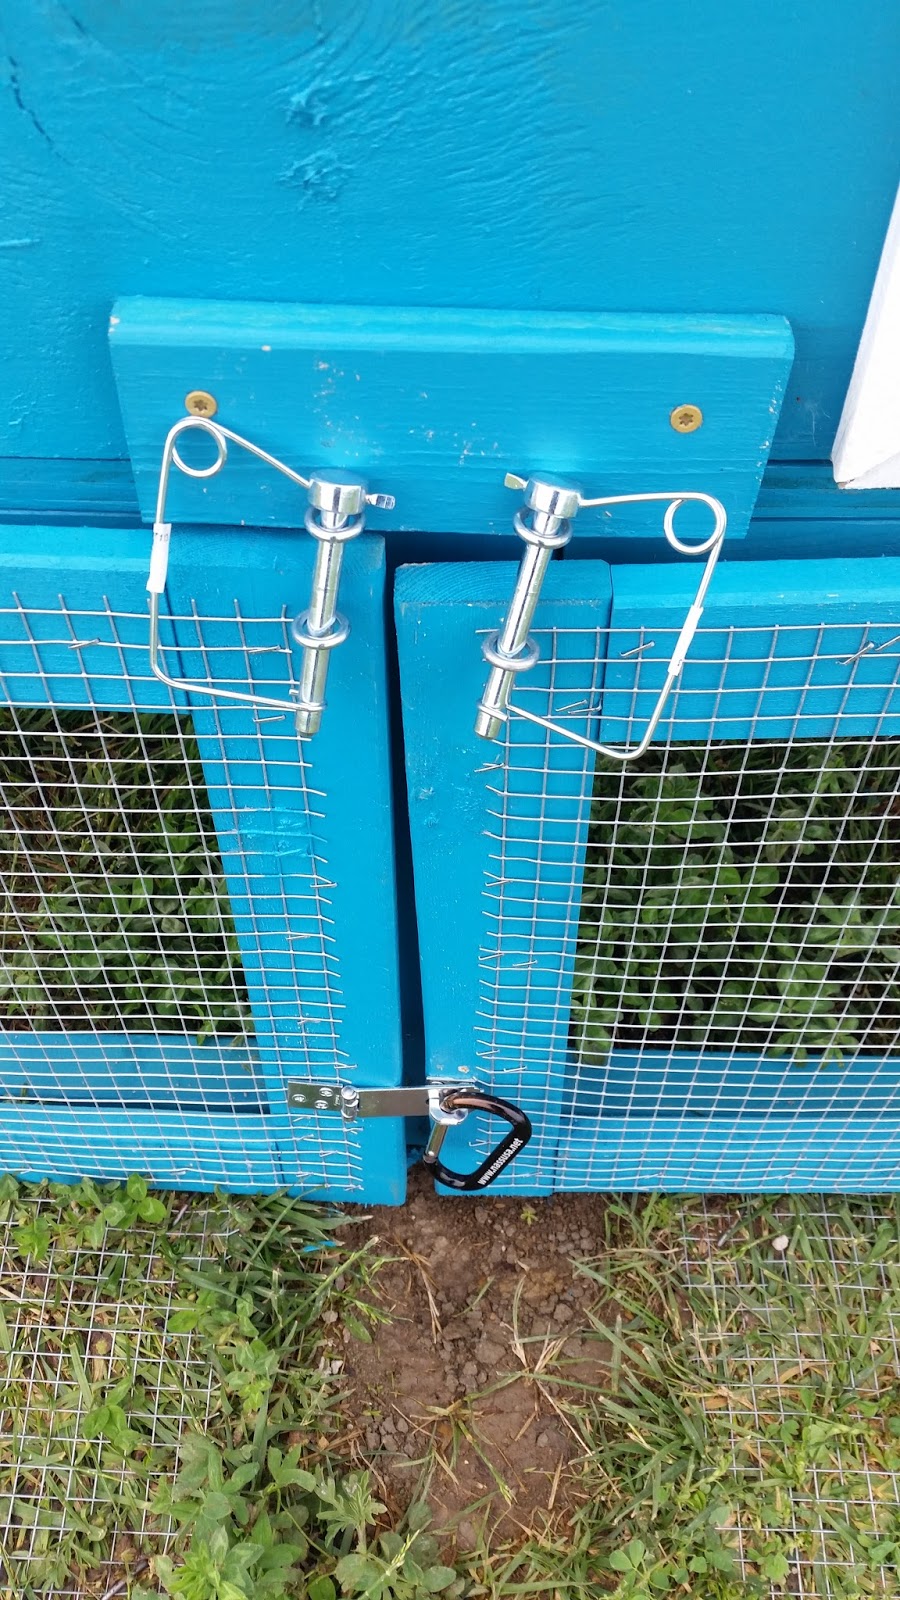
Measure the doorway and create two frames from 1x4s, paint, cover in hardware cloth, and add hinges. Attach each gate to the run and then install critter proof hasps. (I don't like the hasps. There is too much play in them. They will be promptly replaced with a locking barrel closure.)
These are the clips I settled on. They are kind of like giant safety pins! Easy to use and they work great!
I did decide to add a hasps to secure the roof. NOT that any critter can get it open, but even though it weighs a great deal, it will keep the howling winds on my hill from grabbing ahold of it.
If I determine the coop needs more ventilation, it is easy to add more sliding vent holes on either end later. I did decide to add a covered hole for the use of an electric cord if needed in the future for the heating pad. For that I simply purchased a cord pass through. Those plastic things you see on your computer desk, Drill the correct size hole for your piece. Add caulk to secure and replace the cap when not in use. Mine is located high up under the back roof to minimize moisture chances. Always put a drip loop in your cord regardless.
And MOST important... the construction crew approves!
There you have it, Little Lolly. Just in time for the 5 chicks Flora didn't want to raise.
 |
| Doris - white crested Polish (after Doris Day and her grand hats) |
 |
| Dot - speckled sussex |
 |
| BB- partridge cochin |
(Not shown - Dash- the Silver Laced Wyandotte, and Katrina- the Barnvelder)
I shopped for lumber on May 10th and set the posts that night. I finished on May 21st.
I had some of the items already like screws, caulk, hardware cloth, and shingles. The lumber was new as was the window. I was also out of concrete. BUT figuring in what I would have had to purchase if I was starting with nothing in the barn, the whole project come to $240.
That crummy coop from the farm store that lasted one season before the rubbish men hauled it off for me?
$299
Winner, Winner, chicken dinner! Oh wait.... we'll have steak instead.


 Moving hay with a pitchfork may seem trivial, but in gym terms it's "low-intensity/high-rep." Sure, each forkful may be light, but after you've moved a full round bale of hay from outside the garden fence to inside, you have literally moved a ton of hay by hand. (And I moved it TWICE! ~Caryl)
 We've made extensive use of our 4-pound engineer hammer. By time I'm done with it, I can feel the burn in my deltoid, and my brachioradialis and flexor carpi muscles let me know they've been worked, too. (In common speak, his arms ache. ~Caryl)