WARNING!!
All content on this website is copyrighted. Do not use any content of this website without our written permission, to include photos.


Monday, May 23, 2016

The Chick House or Broody Coop Build - Little Lolly

The best place for a chick, at least at my house, in under the butt of a broody hen.  It just makes life SO much easier.  She hatches the eggs, raises the chicks - teaching them to eat, dust bathe, navigate the hen house, roost, all the while protecting them from overly interested flock mates.  She cold hardens them on their long walks, occasionally stopping to warm them or help them find food.  The chicks grow up with the flock, finding their own place in the pecking order and just become one with the universe.

But as we have seen, sometimes we have chicks and no broody around for them.

Sometimes we have a broody who needs a quieter place to sit.  As much fun as it must be for them to be sitting on and protecting eggs, while her flock mates decided to come and sit ON her and lay their eggs.  Of course the constant probing hands under her to check for eggs that AREN'T hers, cannot be calming for her either.

ENTER the Little Lolly (the main hen house being Oodalolly)

Like thousands of great ideas before it, Little Lolly was born on a napkin.
  The rough design was based on a complete piece of garbage coop we purchased from a local feed store during a chicken emergency in November of 14.  We knew it was shoddy materials and design when we put it together.  We also surmised that it wouldn't last a year.  I swear it was made of balsa wood.  The numbers of improvements and modifications we had to make just to make it chicken friendly and predator resistant was crazy.  (I didn't say proof, as a 100 year old, blind, arthritic, toothless raccoon could get it without even trying.)

I honestly wish these companies would stop selling these things to people.  It only sets them up for frustration and failure.  They are cheap (but not cheap), far too small, and an open door for predation.

I digress.

I wanted something permanent.  I wanted chicks OUT of my barn bathroom.  (Not that they don't make for perfectly wonderful entertainment for longer visits to the loo.)  Their dander, their incessant high pitched chirping, and let's be honest, their stink, was just not wanted in the bathroom.

I'd like to raise and sell chicks again, and I don't want to be constantly tripping on peepers on the way to the toilet. 

Out came the pen and napkin.  A few tweaks later, and a trip the best little lumber yard in the next town over and I had a pile of ply that fit in my truck, and dimensional lumber piled in the barn.  This is the same time I had Flora playing "I want to hatch eggs, but don't want chicks". So I started immediately in hopes of getting the little family out of the grow out pen in the barn and into Little Lolly in the yard, so they could have their own space and get to know the flock.  (Little did I know then that she would abandon the chicks.).

The first thing I had to do was pick a location.  I had to find some place as level as possible on this hill, as I am not a huge fan of dealing with the run skirting and angled wood pieces.  I found a space between the barn and the main coop and built a foot print box to help mark the location of the post holes and to check the area for level.

After the posts positions were marked, I dug holes set poles in concrete, and used the box footprint and a post level to get them as close to the correct final position as possible.


I let the concrete set for two days.  I planted the garden and some more trees.  All under the careful supervision of the hardworking crew one of which is apparently Zorro.


  When the concrete had finally set, and it stopped raining, and the ground stopped being a slip and slide, I tackled the posts with a long, 4 foot level, to mark all of them at correct cut off location.  Since this is a small structure, I went with treated 2x4s as the base posts instead of 4x4s.


Two quick coats of exterior paint in Valspar's True Teal to add an extra layer of protection.

I then measured, painted, and installed the top of the skirt (except on the gated side).


I used heavy, galvanized, hammer in, fence staples to attach the half inch hardware cloth, cutting it long enough so that it would have a 9 inch wide anti-dig skirt around the bottom of the run.  This is secured with landscaping staples.


The coop floor was next.  3/4" CDX plywood with two coats of exterior paint on both sides.  Your paint may say it is one coat coverage, it never is.  Wood is thirsty and will suck up the first coat, leaving your project splotchy looking.  Take the time to do two coats.

I secured this with exterior deck screws that were 2 inches long.

While I had full access to the whole coop floor, I cut the pop hole.  I decided on 14"x10" and then framed it with 1x2 to keep the PDZ from falling out willy nilly. 
The ramp is on a hinge, is covered with shingle, and has an eye on the end for a pull string.  The first week of chick life, the ramp is up and they can live inside.  After that, the door is down all the time to allow them to go in and out at will to and from the run.  At a week old, they are old enough to get up and down the ramp and in and out of the coop.


This is the point in the project I started to feel numb.  Last year's mega build was still fresh enough in my memory to trick my soul into KNOWING I COULD do it, but far enough away that I had forgotten how much work, how many sleepless night, how much money, and how much planning and physical labor it all was.  Kind of like childbirth.  With Flora having abandoned the chicks, I was still up against a clock of getting the chicks out of the pen in the bathroom, but the clock had slowed, as the escape artist hen was now locked solidly in Sing Sing.  I also knew that dry cooler air for the week would end abruptly, and 80s and 90s, humidity, and thunderstorms were right around the corner.  With that deadline looming, I went fishing.


It's amazing how just one evening away from a project can reset your sensibilities, your nerves, and your sanity.

The next day, I was off and running again.

The walls were built inside the barn.  I started with the most complicated wall, the front wall.  It has the window in it.  I tried Habitat for Humanity for a small window that could be opened, but alas, they had none this trip.  The 1/2" plywood was painted with its exterior teal blue and interior color, which can best be describes as scrambled eggs.


Along the bottom edge, which will be attached to the floor with 2.5 inch screws, I cut and placed a painted 2x2". I placed a second one NEAR the top edge but not TO the top edge.  If you place it at the top, the slanted top will not close.  Attach the 2x2s to the plywood with 1 5/8 screws. Measure and cut additional 2x2s for the vertical inside end pieces.

Now it is time for the window.  It's really easy as it doesn't need a frame for support due to its size. Using a screwdriver, remove the screen spline and the insect screen from the window.

  We won't be using it.  Sitting the back of the window on the wall where you want it to be, TRACE the window footprint with a good pen or pencil. 


Using a drill or paddle bit, drill near the corners to allow room for your jig saw to start.  Be sure to cut ON the line or just outside of it. 


When you get to a corner hole, square it off with the saw blade.  Test fit your window.  Make sure you have the bottom edge of the window in the down position of your wall.  It has the seep holes for rain and ice.


From the outside of your wall, gently drop the window in the hole and secure it with short screws to the plywood through the holes provided on the window.


Cut a piece of hardware cloth that is the size of the window panel plus about one inch to wrap around under the area that will be filled with the trim wood.  Cut the corners off so that you don't get bulk at corner that will not allow the trim to fit. 


Paint 1x3 or 1x4" pieces and cut to fit length and width of the window.  Attach with short screws.  Fill any corner gaps and screw holes with paintable caulking.  Allow to dry and touch up the trim paint.

Attach the front wall to the floor using 2.5" deck screws.  At this point, if you have to leave the project without surrounding support walls, add a scrap piece of angled wood to act as a temporary support.

The back wall basic construction is the same.  The difference in in the ventilation holes and the system to operate it.  It looks great and complicated, but is actually quite simple to build.  A chicken can handle the cold.  It's wearing a down coat.  Chicks cannot handle the cold for long as they don't have anything but down for the first few weeks.  When there's not a mother hen available, I use an electric broody plate which is far and away more safe than a heat lamp.  The chicks quickly learn to duck under when they get chilly, just like they would a hen.  Then they pop out to play. Rinse and repeat.  Over time, they spend less and less time under the heat pad. But they still need ventilation, but not a draft.  That said the back wall has a row of vent holes.  The flow can be controlled by a sliding door.

To build this is easy.  Just take your time.  Figure out how long of a space your holes will take up and add 4 inches.  That's how long your door slide piece will be.  Make sure you have the room for that on your wall.  The height of your slide will be the height of your holes plus 4 or 5 inches.  I simply painted a 1x4 and a 1x2 and attached them with screws and created a frame on the back of the window, leaving one end open. 
This is where you will slide the board in.  Make sure the scrap of plywood you use is thin enough to slide freely in the slot. Add the 4th end.  Caulk and paint the joints and screw holes.  On the inside of the vent holes, inside the coop, use a staple gun to cover the holes with more hardware cloth.

On the back wall, I placed the 2x2 as I did on the bottom of the front wall, but on the top inside of the back wall I used a 2x4 as this will allow for a solid mounting for the roof hinges. Measure and add the vertical 2x2s on each interior end.  Screw your back wall to the floor of the coop as you did the front.

Next is to create the end pieces.  The front wall is 24" high, and the back wall is only 20" high.  This allows for a gentle slope on the roof to shed rain. (6 feet long and 24 inches wide coop).  To create the end, I measured across the bottom of the end piece, 24", checked the front height, and back height and cut the ply to match.  Again I added a bottom and a near top 2x2.  It does not need vertical 2x2s as you can screw the end ply pieces to the vertical front and back wall studs.

The roof is a 7 foot x 41" (how wide my SUV is). It is painted on both sides and attached with very large and heavy duty hinges.  I purchased shingles from The Habitat for Humanity Re-Store for only a dollar a package.  DEAL!

BUT WHERE IS THE DOOR?!  The roof is the door!  It is heavy, but a 2x2 on a hinge acts as a large, safe kickstand to hold it open.  I may decide later to add a door on the side, but you wouldn't be able to access the whole interior from it, so I probably won't.  With the roof open, I can access ALL of the interior.


After the roof was shingled. I added a drip edge (should have been first, BUT I had to find it in the store.) and I added a top edge to match the main coop.  Painted 1x2s were added as trim to match the large coop, as well as a metal chicken silhouette, like the main coop. 


The final step is to add the front gates.  Measure the upper and lower opening and measure and cut 2x2 and using screws, toenail them in.  To the bottom of the front skirting, using fence staples add hardware cloth digging barrier.

Measure the doorway and create two frames from 1x4s, paint, cover in hardware cloth, and add hinges.  Attach each gate to the run and then install critter proof hasps. (I don't like the hasps.  There is too much play in them.  They will be promptly replaced with a locking barrel closure.)

These are the clips I settled on.  They are kind of like giant safety pins! Easy to use and they work great!
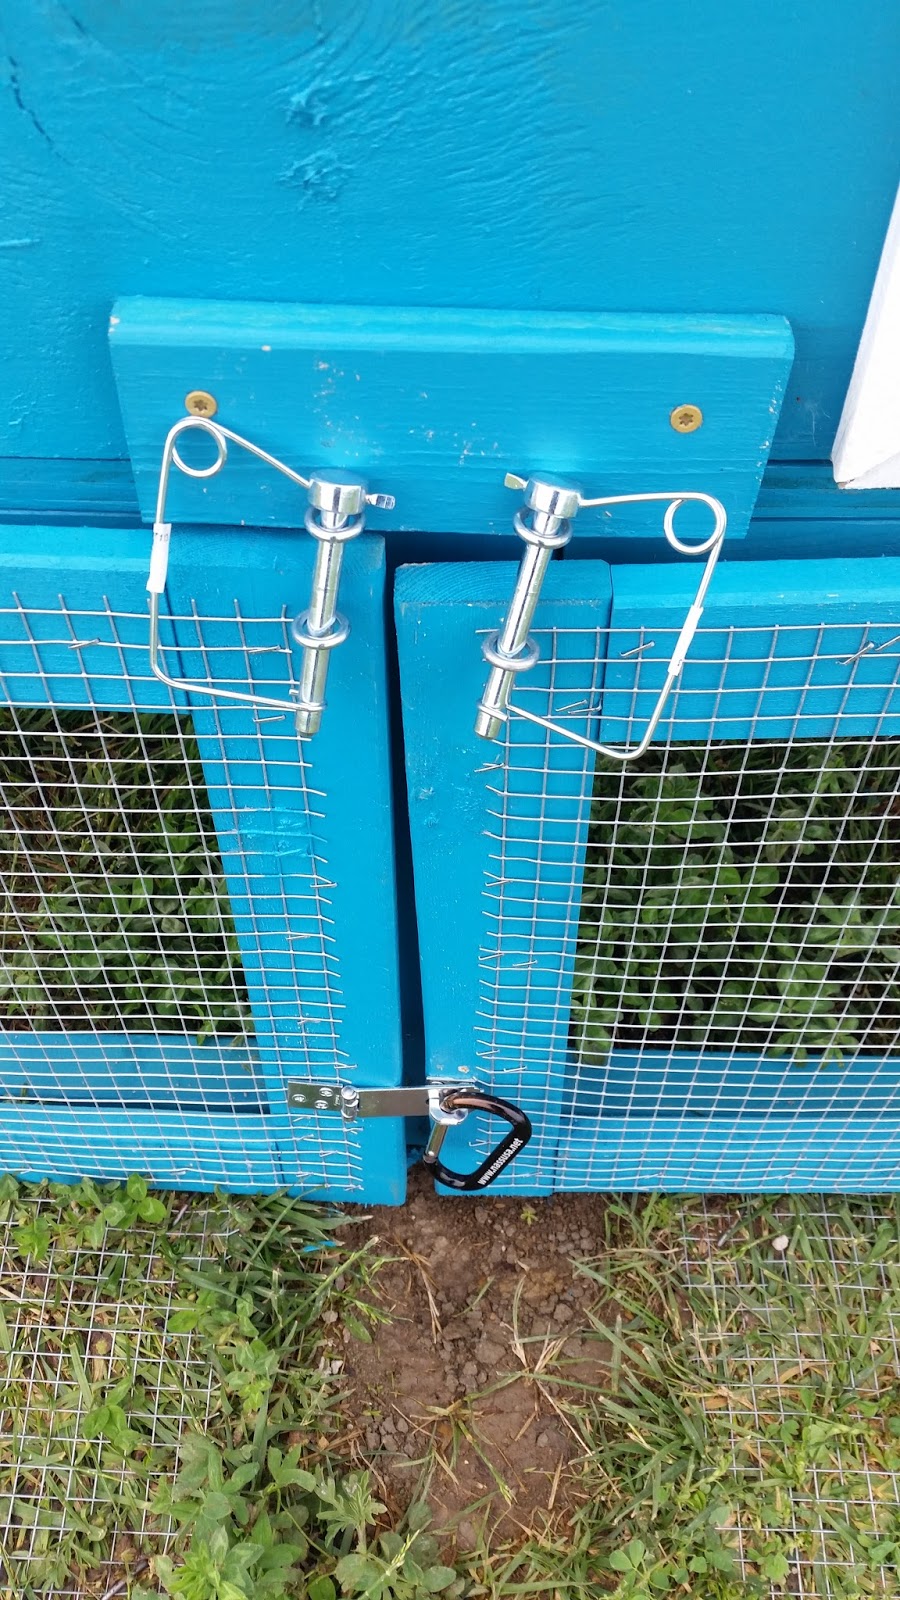


I did decide to add a hasps to secure the roof.  NOT that any critter can get it open, but even though it weighs a great deal, it will keep the howling winds on my hill from grabbing ahold of it.


If I determine the coop needs more ventilation, it is easy to add more sliding vent holes on either end later. I did decide to add a covered hole for the use of an electric cord if needed in the future for the heating pad.  For that I simply purchased a cord pass through.  Those plastic things you see on your computer desk,  Drill the correct size hole for your piece.  Add caulk to secure and replace the cap when not in use.  Mine is located high up under the back roof to minimize moisture chances.  Always put a drip loop in your cord regardless.


And MOST important... the construction crew approves!


There you have it, Little Lolly.  Just in time for the 5 chicks Flora didn't want to raise.
Doris - white crested Polish (after Doris Day and her grand hats)

Dot - speckled sussex

BB-  partridge cochin


(Not shown -  Dash- the Silver Laced Wyandotte, and Katrina- the Barnvelder)


I shopped for lumber on May 10th and set the posts that night.  I finished on May 21st.

I had some of the items already like screws, caulk, hardware cloth, and shingles.  The lumber was new as was the window.  I was also out of concrete.  BUT figuring in what I would have had to purchase if I was starting with nothing in the barn, the whole project come to $240.

That crummy coop from the farm store that lasted one season before the rubbish men hauled it off for me?
$299

Winner, Winner, chicken dinner! Oh wait.... we'll have steak instead.

Saturday, May 21, 2016

If it's not broody, it's balding!

There are just some days on the homestead when you just have to stand there, eye rolling to the point they might just get stuck that way, hands on your hips and say, " OH YOU HAVE GOT TO BE KIDDING ME!"
Does this shadow make me look fat?

The past two weeks have been downright silly on the farm.  The weather has been dry, mixed on occasion with deluge.  The severe weather, with tornadoes and softball size hail (yes, SOFTBALL) fell within two miles of our old place, where they also had 10 inches of rain in two days.  Us, nothing, but a really cool Quint Gold Sky with a triple rainbow.  The reason we've had no rain is that we've planted more trees, which means we've had to haul water.  ::hands on hips, roll eyes::

We've also bounced between 80 and 36'.  The reason it got so cold was that I took all the windows out of the coop for the summer AND had tray upon tray of vegetable seedlings on the deck ready to plant.  ::hands on hips, roll eyes::

The new tractor, Hansel, acted up on me too.  He's a dream and been doing a great job helping me get rid of what has become known as the "dead elephant" in the hayfield.  The "elephant" is a giant, steep pile of dirt that was left behind when they dug the septic tank.  The problem is that it is too steep to mow and too steep to take the harvester over to mow hay.  When it is dry enough, I nibble away at it, placing the reclaimed soil in needed places in the fields.  Well, Hansel kept blowing a fuse, the SAME 5A fuse.  In fact, this last time, it blew the first time I started it after the nice worker drove an hour out here to replace it.  The company came to pick up Hansel and he was gone for a week.   ::hands on hips, roll eyes::

(Turns out a simple loose wire was rubbing the harness and blowing the fuse.  Problem fixed.)

It's amazing how much you miss your tractor when it isn't home! But the little tractor, Gretel, does a great job hauling around the trailer for odd jobs, so I focused on those.  One of those projects was to gather the old 18 inch glazed drainage tiles that we found in the field when we moved in.  They were from the 1880s and really cool, but we had no idea what to do with them, and they were constantly in the way.  I took the tractor and trailer down to the bottom of the hill.  The 30 inch long pipes weighed a ton and all had a date with the 4# engineers hammer. 

The first strike rang out like and old dinner bell across the valley.  Humpf.  While the darn things would crack, chip, or crumble if you looked at them cross-eyed, when you WANTED them to break, no go.  I cinched up on the hammer, invoked Casey Jones, and with a mighty whack split the standing 30 inch 30 pound pipe in two.  The weakest bit falling in a slow motion arc, towards the front of my squishy pink ankle.  Oh, ya, there was swearing, and blood, and a deep razorblade perfect gash.  Dag blast it. (I will spare you the gory photo.)

A quick check for extra bits of old potter in the wound, a splash of cringing water and a wrap with the ever present bandana, and one quick call to the doc (the kind that can actually help you~~Doc) about WHEN a tetanus booster is needed (am due next year, but will not wait that long) and I was back to work.

By this time of the game, my hands have been on and off of my hips so many times in situational amazement that I should have shoulders the size of a linebacker.  Oh wait.....

And it gets BETTER!

As you may remember, Daisy had a clutch of eggs.  They are getting along beautifully. 
Daisy with Andy, Helen, Ellie, and Bea
We had the cancelled zoo chick order and a gifted mini Zap from a friend.  Mini Zap has turned out to be a French BLUE, just like his daddy.
Ernest, Barney, and Thelma Lou
  The goofball three were in my way in the barn, and with the nights a little warmer, I moved them to the city bitty coop in the yard, which required a makeshift run.  This would also allow the three to be outside and get to know the rest of the flock and vice versa for a couple of weeks.  So no drama there, right?

Well with all these baby birds chirping around the place, the hens started getting ideas in their little bird brains.  13 hens and it was a contest among them to see who could drive me the most crazy.  Violet went first.  Let me tell you, when a giant bird that is huge and fluffy on a normal day decides to go broody, she expands like a peep in a microwave.  Suddenly a normal, sitting hen turns into a growling, flat as a flounder beast, who after her first beak snap at your fingers expands like she is hooked to an air compressed.  Seriously, she completely filled a 13inch square nest box.   ::hands on hips, roll eyes:: BANNED TO BROODY PRISION!


Flock Shaming

Two days later, Flora pulled the same game.  The problem is, I only have one broody breaker box and Violet wasn't done yet.  So Flora just sat in the coop nest box, being about as friendly as a stepped on nest of ground hornets.  ::hands on hips, roll eyes::

  By the time Violet was broken, Flora had been broody for a solid three days, but then she was  BANNED TO BROODY PRISION!

Then we waited, and waited, and waited.  She only got more adamant that she was going to be broody and wanted eggs to sit on. At day 8 of Flora being broody, it was Olive's turn! ::Hand to hips, roll eyes::

We've broken Olive before, and she's quick to break and quick to lay again.  So we took Flora out and put Olive INTO BROODY PRISION!

This left me with a really mad hen in a nest box.  We decided that if she wasn't going to break, why not give her two, just TWO, of the last of Zap's eggs.  At 10 days old, it was a LONG shot that they were fertile, but hey, why not. On day 5, we snuck out and candled  them.  DUDS.  Clear eggs and a stuck broody hen.  NOW WHAT?!  ::hands on hips, roll eyes::

More eggs!  I called other bird brains (fellow chicken farmers), no one had eggs.  Either their hens had stopped laying or they had just sold out at market.  I called 7 and no one had eggs.  So I called a hatchery that was just an hour up the road.  They said come on up and pick up some chicks to sneak under her. 

We set up the large grow out pen in the barn and moved Flora and her DUD eggs into the nest box there while I drove two hours to pick up a white crested polish, a barnvelder, a silver laced Wyandotte, a partridge cochin, and a speckled Sussex.  Late that night, The Boy and I snuck out to the barn in the total darkness.  He lifted her with one hand and stole the eggs with the other. As he held her up, I put all five chicks under her.  She snuggled down, the chicks stopped peeping and Flora started to purr.  Crossing our fingers, we went to bed.  In the morning, she would either have accepted them, or there would be disaster.

The next morning when I went out to feed the flock, I went into the barn to check on the newest little family.
  Flora was literally climbing the walls to get away from the chicks (hey, we've all been there) the chicks were cold and chirping for a snuggle, and wait... there were only 4!  From somewhere in the deep dark corners of the barn there was a lonely chirping. UGH, Flora scared them so much, one panicked and found a way out.  Now I have to hunt for a tiny chick.  She was hiding under the ratchet rake for the tractor and covered in cobwebs.  So that was a failure.  Flora was sent BACK TO PRISION, and the chicks back to the chick pen and the warmth of the electric hen.  ::hand on hips, roll eyes::

 It took another 5 days to break Flora.  The Broody breaker was no sooner dry from her stay and Meriwether went in for a day stay.  She's no longer in, but I'm not convinced she's done faking us out.  In fact, she's spent all day in a nest box growling at her friends.  ::hands on hips, roll eyes:: 

She was lying.  It took her another three days in Prison to Break.  ::hands on hips, roll eyes:::

This whole time, I'm watching my own egg house production drop like a rock.  I first blamed it on the fox attack, but it kept dropping.  At one point we were down to 2 eggs a day!  This is NOT the way to act during farmer's market season girls!  What's the deal-io?  THE MOLT!   ::hands on hips, roll eyes::
My post broodies weren't laying, and the molting girls were taking a break.  We have feathers EVERYWHERE!  EV...ER...Y...WHERE!!!!  Even during their daily dust baths are loaded with fallen, loose feathers when they get up.  I guess it's their version of the ring around the tub. 

All this chicken shuffling forced a plan to build a chick house/broody house way sooner than I expected.  But that's another post!

Update
Monday Night
We just had 2.7 inches of rain in 20 minutes and hail the size of peas and almost dimes for three minutes. WHY?! I Finally got around to planting 150 feet of sorghum and 80 sq Ft of sunflowers today.  ::hands on hips, roll eyes::

Friday, May 6, 2016

We skipped Spring.

As is typical for this part of the country, we skipped Spring and went right into Summer.  Well, we did have Spring.  I think it was at 2:06pm on a Tuesday. After that, Summer hit.  We've been in the 70s, and today we hit 89.  At least it is dry.

We had a span of several days where it was chilly, clammy, and rainy.  As soon as the sun came out, the temperatures started to climb.  But as long as the humidity stays down, I'm a happy camper.

Surprisingly enough the sun did manage to rise last Friday without our diligent Zap calling it out.
  I kept thinking I heard him, but it was some other noise that my brain was reinterpreting it as crowing.  My morning walk to the egg house was further depressed by the view.  Sigh.
 
The rains came the next day, returning the feathers to the earth. 
 
Ethel took a few days to stop hiding in a nest box.  She is missing about a third of her feathers, and it was in the low 40s at night, so we had no issue with her hiding and keeping warm in a box.  By Monday she was sleeping on a perch again and has stopped hiding in the run when she is outside.
 
Cirrus spent three days in the barn so we could keep an eye on her wing and her wounds.  As soon as she was returned to the coop, she started back in at eating and laying eggs again.  She still sleeps on the floor in the back corner of the coop, but she'll get there.  I trimmed her wing feathers on her right wing so she wouldn't step on them, and she had a limp, but that is now gone.
 
Also on Monday, we started letting them back out in the evening, as long as we were out there with them making a lot of noise.  They stuck close for the first two days, but by Wednesday evening, they were out in the deep, high grass in the meadow.
 
To drag us out of our funk, the girls decided to keep us well entertained (read busy) this week.  Just when we thought egg production couldn't go much higher, we caught them queuing up for the nest boxes. 
This is what the stacking hour can look like.  Chickens will actually SIT ON, and LAY EGGS ON other chickens.  The goof balls.
 
But the fun doesn't end there.  We moved Daisy and her chicks; Bea, Andy, Helen, and Ellie, to the big coop.  That alone should be enough entertainment for any one coop in a week.  But two days in the coop with a broody hen and her cute little chicks, and the hormones started to fly.  Violet went broody on us and just as Cirrus was coming OUT of the barn cage, Violet went in.  Two days after that, and Flora started growling in a nest box and puffing up to the size of an angry watermelon.  But Violet had to break before we could take her out of chicken prison to put Flora in.  Yesterday, we took Violet out, put Flora in, and today OLIVE spent the day in a nest box growling and trying to take my hand off.  Glory!
 
Meanwhile, Daisy is taking great care of her chicks.  They crack us up.  They snuggle at night, but Daisy doesn't look very comfortable.  I also noticed that they have nightly company in the coop.  It's a mouse who apparently has access to night vision goggles.  He's either brilliant for living in there, or the dumbest mouse in history!
 
As for the zoo chicks, the zoo cancelled their order on me.  SO, Noodle and Nugget have been renamed Barney and Thelma Lou.  They have also been joined by ERNEST!  Ernest was a gift from my fellow chicken addict, Becca.  She heard about Zap, and texted me to tell me that from the eggs I gave her a month ago, she had ONE cockerel left of Zap's brood.  I'll be interested to see if he grows up blue or black. (I also scrambled to gather another dozen of Zap's eggs from the Marans hens so she could hatch more and carry on his line at her place.)
 
Speaking of his line.  I stopped by a home that I supplied chicks to back in January and again in March.  I was dying to see what they looked like almost grown up.  The three January chicks are amazingly gorgeous French black copper Marans.  The cockerel looks just like Zap, except black and copper.  He also had ONE feather on ONE wing that was tipped in white, JUST LIKE LUCY!  So there's a little piece of both of them across the valley.  (The March chicks were still in their teen feathering, but the coloring was amazing!  There were shades of copper, blue, greys, and speckles.  Several laced birds and they all looked so happy!)
 
Insanity, thy name is Chicken Keeping.


Norwegian gown update.
 
Last week I finished the linen blouse. 
The drape is fabulous.  The fit is, well, blousey!  I'm reminded of the puffy shirt from Seinfeld.  It has top stitch decorative stitching and my Bunad silver is perfect as the collar close, like it should.

 
I worked on the skirt all this past week and some of last.  Ugh.  For such a simple piece, it took forever.  I found that if I am not fully into sewing, I make a stupid number of mistakes.  I've had to walk away from the project many times.  Once I get going though.  After getting into a groove I made great progress.  I  love the way I chose to construct it.  It can be taken out and let in.  It is full, but light, and has an amazing drape and with the placement of the pleats, it is quite full.  The number of pins used in holding it all in place while I worked was insane, but necessary.

  Blood was drawn.  Words were said, and they weren't very lady like words either.
 
I have an appointment with a tailor shop on Tuesday to have the hems marked on the skirt, petticoat, and apron while wearing my shoes.  It's just not something one person can do correctly. They'll mark it and I'll bring it home and sew the hem.
 
The LAST project is the vest.  I'm working from scratch on this one.  It's a long vest with a peplum.  I think I'm out of my mind.  I've made two samples from inexpensive broadcloth.  By making these, trying them on and marking them where they need to be let in and taken out, and then taking them apart, I can use them to make new patterns and try again.  Thank GOODNESS for my serger!  It still has a long way to go, but I'll get there.
 
Stay tuned.