WARNING!!
All content on this website is copyrighted. Do not use any content of this website without our written permission, to include photos.


Thursday, December 24, 2015

Brower Top Hatch Incubator and the New Year's Eve Hatch-A-Long

I did it.  I finally decided to take the plunge and see if I could get these cut fluffy birds to produce some even cuter fluff butt babies.  After all, Zap, the rooster, dancing like Fred Astair, and stomps on anything that will stand still long enough.    Certainly I could get some chicks out of this crowd.  I have been seeing fertile bullseyes when I use the eggs to cook with, so all is good on that front.

While not producing eggs up to full steam, I am still managing to get a dozen eggs from 14 girls every two days.  I have two in full blown ugly molt, and one that is trying to go broody. Plus we are in the dead dark of winter. 


There is a family up the road that has just finished building a coop and asked me if I could hatch a dozen winter chicks for them to fill their coop.  Well, I didn't have a broody, so I started researching incubators.  I settled upon a little known incubator that not only sported plenty of room, up to 48 hen eggs, and had a great view, but was fairly easy on the budget.

I followed the directions in setting it up and adjusting the temperature, which was quite easy.  The temperature is controlled with a simple 60W bulb.  The eggs are gently rolled instead of tipped to rotate. 


To get the dozen pellets the neighbor wanted, I decided to set 24 eggs.  Some of those won't hatch, and of those half can be males.  So that would get me close.

By day 10 I should have seen development in the eggs with candling.  There was nothing.  All 24 eggs where clear, duds.  So either my incubator temperature spiked for too long ( I caught it one night not switching off and it was 104) or every single one of my eggs was infertile.  It could happen, but I can't see it. 


The incubator regulates its temperature by switching the light bulb on and off.  If it needs to reach the required 99.5'F it stays on.  If it has reached the 99.5'F, it simply blinks on and off to maintain it.  Honestly, this can drive you positively INSANE.  We moved our incubator from the dining room to an equally temperature stable, albeit, less visual room, the office.  You could see the incubator blinking on and off in the dining room through the windows from over two miles across the valley at night. 


Day 11 Clear French Blue Maran Egg

The drum is made from a heavy duty plastic material that is not only washable, but can go in the dishwasher to sterilize it between hatches!  A huge bonus.  Although I don't think it holds the heat very well, even in a 70'F house.  So I made a thermal blanket that wraps around it and it held on with simple elastic bands.  I used industrial insulated ironing board fabric.  I think it helps hold the temperature a little bit better than without.

SO, as soon as I can find out if the neighbor wants me to try again, I'll set some more eggs and see if I can get this incubator to produce some chicks.

The company is being fantastic.  They said they would send me a new base, which is where the thermal regulator is.  We had more eggs to eat yesterday, and I definitely have fertile eggs.

The neighbor up the road also called this afternoon and said to keep trying!  So as soon as we get it all going again, I'll update :D

December 23rd - Incubator is plugged in and heating up and we'll start collecting hatching eggs again tomorrow!

UPDATE - 31 December

I collected 22 eggs from the goofballs.  Turns out, only 8 are even laying when I took a good look at what eggs were being collected.  (For all of you non chicken people, yes, when you have different breeds you can tell the owner of the eggs.  Even if you have few enough of the SAME breed, you can tell who laid which egg.)

5 of the girls are either just finishing molt, or are in the middle of a molt.  You know, because the middle of a Nebraska December is an awesome time to go naked!  One, Daisy, is just out of chicken jail for being broody, so she isn't laying either.

SO, 22 eggs went into the incubator on Monday morning.  Because I forgot how to count to 4, I candled eggs tonight.  I should have counted tomorrow, as MONDAY was day ZERO.  So some of my eggs aren't quite far enough along, if they are fertile, to see into, since I have some seriously DENSE and dark eggs.  5 eggs though are CLEARLY veining and all have great air cells.

I will candle again on the real day 10, which is NEXT Thursday.  Tune in.

I cannot believe I'm trying it again with this base (new one will be here later).  I hooked up another temperature gauge and hygrometer , which I can watch remotely and can set alarms if the temperature breaks a set of parameters that I set.  So while I am having to babysit the base, I feel better about it.

I am also going to pick up some tubing that fits into one of the lid vent holes and attach a funnel to it so that I am able to better add water to the drum.  A cup of hot water is a drip, overflow, wet egg accident waiting to happen.  This time I have a couple of empty pie sections, but that won't always be the case.  The tubing will allow me to more accurately add fluid.

Check back for more updates! (will be added to THIS entry)

UPDATE** 4 January 2016 Day 7.5

We started with 22.  Of those, only 4 are fertile and are from 3 birds.  There is clear veining in each and a little wiggly chick with a big eye.  I could not get a clear photo.  We noticed that the rooster mates more when he's out watching the girls free range.  They haven't been able to do that to any degree for the past two weeks due to some seriously wicked winter weather.  That combined with a general winter slow down from the girls left us with fewer eggs to choose from.

COME ON SPRING!

I'll hatch these 4 eggs and see if the coop up the road wants to start their chicken learning adventure with 4 chickens, with another hatch in a month.

Update - Tuesday 5 January day 8.5

I checked on the iffy one of the 4 eggs.  Last night I could see the embryo, but couldn't make out movement.  Tonight, she was dancing like a flea on a hot skillet!  So she's good for now.

I have the incubator on a cool down phase at 98.5'F and 50% humidity.  At least that is what the hygrometer is saying.  I know it's not accurate, but it's as close as I can get after running a hygrometer test with salt.  It's amazing how off these "accurate" things are, even from each other.


Next update Day 13.5 - Sunday
I've kept the cool down cycle going at about 97.9 and the humidity is running anywhere from 47-51%.  All four eggs have little ladies kicking and dancing inside.  I did catch the incubator jump up to 99.1' today.  I have NO IDEA why.  I had it stabilized at 98ish degrees for a week!  I simply removed the lid for a couple of minutes.  I pretended momma hen went on a walkabout.  So far, it hasn't done it again. (blue egg is a space holder to insure that the other eggs get turned properly)
 
They go into lockdown, when I switch off the turning mechanism, on Friday night.  That will also be the day I do a final non-turning candling.  Hatching should be anywhere from Sunday afternoon to Wednesday.
 
Next Update- Day 18 Friday
 
Four eggs went into lock down and they all looked great when candled.  I knocked the humidity up to 65% and walked away. There will be no lid lifting until hatch day on day 21 (Monday after 3pm).
 
 
Day19, 20 - If we held a BRIGHT flashlight over the lid and focused really hard on the light spot on the shell, you could see the egg wiggle the tiniest bit.
 
Day 21 - 6am-ish One solid external pip on egg #2 in the rows.  At 8am, there was no change at all. I intervened at 15 hours with no change in the pip except for the membrane drying out. Upon assisting the chick (I've done this before.) About 11pm the chick passed away.  It had never absorbed the yolk sack.  So nature took its course.  I have been adding hot water to keep the humidity up to as close as I can get to 60% in a dry house. I did check, without TURNING the eggs, and all 4 had their heads internally pipped into the air cell.
 
Day 22- Egg #1 pipped and fully hatched out Tuesday at 630am.  She is adorable and a salt and pepper blue with a fluffy white butt and wing tips.  At this time Egg#3 and #4 both had pipped as well.  Egg#3 hatched fully at 6pm. The older chick was dry and fluffy and curious about her new sister.  She especially enjoyed chasing her and picking on her.  Sigh.  Egg #4 still only had a small pip at 2am, but had rolled upside down.  At 4am the hole was bigger.  This morning, which was hour 18 after the first hole through the shell, there was no change but the chick was peeping like made.  She was stuck.  A light tug on the dried out shell, and out she came.  Her membrane was leather.
 
I had to take the mean girls out to the broader.  They were WAAAY too interested in the new chick and the umbilical to the shell.  I put them in a small lunch pail cooler, lined with a paper towel and took them out to the barn to the brooder box under their Premier1 brooding plate. I showed them the food and water and walked away.
 
The new girl has the same exact markings as the first two chicks.  LOL. That rooster has some STRONG genes as the hens are NOT the same breed.
 
I'll get photos when everyone is dry and behaving.


Wednesday, December 23, 2015

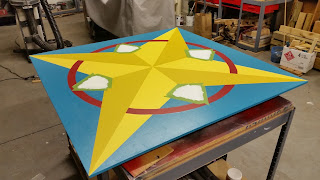
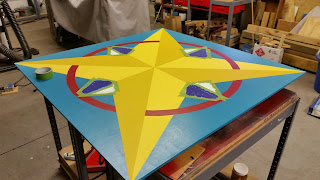
As long as I was in a painting mood... The DunRovin Station Star

The great barn square project, yup, I just HAD to do it!

Being a former quilter, and living just up the road from the National Quilt Museum, and having a blank canvas of a barn, it was kind of a no brainer to join in the party.  The Barn Quilt Project and Trail have been around for a while.  My barn however, is new to me.   With a stunningly bright teal chicken house set against the dull, dusty sienna grassland, I thought the tan barn could use a boost.  Thus another project was born.

A barn square is a 4x4 foot square of plywood.  The pattern can be a traditional one, or an original one.  It can be chosen at random for the simple love of the pattern, or can have a family link or history, or can be picked for a significance to the name.

I looked, and search, pondered, and studied.  I couldn't find anything that suited the style I wanted, which is transitional with a modern flair.  Nor for the area, which is land and beach.  Or the color combinations I wanted to use.  I knew I wanted to use the bold teal on the coop and a neon yellow.

When all was said and done, I decided to come up with an original square.  I started with the traditional mariner's compass.  I decided to make it dimensional.  I also wanted a wedding ring, but then decided to intertwine it in the star.  Then I decided to balance the front star with a peak a boo star behind.

A 4x4 foot square of 1/2 inch plywood. Smooth and sanded.
I sealed it on both sides with left over light coloured exterior storm
coat paint.  Light colors layered above will come out cleaner looking
if painted on a lighter base.

The pattern was measured off and drawn with a watercolor pencil.
I then used FROG painters tape to mask off areas so I would get clean lines.

I only needed small amounts of the secondary colors, so I opted to
purchase small sample colors from the hardware store.  They only run
$2-$3 per container and are perfect for smaller projects.  In this case, bright
yellow and a classic gold.

I moved on to the background teal which matches the henhouse.  Valspar's
True Teal. Then taped off the next section of points.

Just look at the dimension starting to pop right off the board!


Each layer of yellow/gold took 4 coats to really make the color sing. The background
Needed two coats.

The ring is Cut Ruby.  It took three coats to be solid and bright
enough.  I just freehanded it.  I created the arc with a pushpin, some string
and a pencil.

Getting there.


I taped off the background star and painted them with two coats
of white primer sealer.

I taped off one side of the background star so I could paint it
Homecoming Blue.


UPDATE - I called several local contractors as this project was going to need a small cherry picker to mount on the barn.  The grade behind the barn is not favorable to using a ladder and the extension ladder was 2 feet too short.  The size of the square and the wind we normally have would just make it lethal for US to try to put it up.  This is one of those situations where it is well worth it to hire someone to DO it for you. 

All of the contractors were not only disinterested, but booked out for months.  Brain storm !  A TREE TRIMMER!  This isn't their busiest time of year, and with the holidays, who couldn't use some extra cash?!  I called the closest tree trimmer to the house, 30 miles, and described what I wanted done.  He'd seen some barn squares, but didn't know about them.  After I assured him that he could drive his truck right up next to the barn and screw in the board, he gladly said yes!  We had to wait ten days for the weather to cooperate, but he came today and it's UP!  I had it all predrilled.  I put 1 inch thick silicone grommets on the back to hold it away from the siding, which he thought was BRILLIANT!  There is a screw at each corner, and one on each side.  It's NOT going anywhere.

In the bright sunshine (NW) roadside of the barn, it shines like a diamond.  It is the same teal as the coop, which also shines in the dusty grey winter, and the bright winter snow!  We've already had people slowing down on the road to look.  YAY!


Tuesday, December 22, 2015

The end of December and STILL deep in Project-land.

I can't help it.  I love projects. Well, I love starting projects and finishing projects.  Somewhere in the middle of a project I have that "why the heck did I start THIS for?" moment.  But I guess we ALL have those.

Luckily we decided to forgo dealing with Christmas celebrations this year.  We are so far out in the great nowhere that decorating with holiday lights is not only a waste of time, but a waste of $$ to burn electricity.  We put so much money into projects in and for the house this year, that we just decided to take a pass this year.    We purchased a large 10 foot sugar maple and had it planted and called it a family gift to ourselves.  Merry Christmas to us!

Remember the post about never finishing the chicken coop?  Well it overheard us.  The corrugated roof leaks in the run.  It leaked FAR too much.  In the summer it wouldn't be an issue as the sides would be open and the summer heat would dry the run.  In the dead of frozen winter, there would be nothing to drip.  But the in between seasons, and in particular THIS WET, WARM December, water water, everywhere!  We've had insane amounts of wind driven rain, freezing rain, and snow.  It was just too much for the run, and the locked up girls to handle. 

We took off the old corrugated roof, and replaced it with a super heavy duty black tarp.  That is pulled drum tight over a deck board sub-roof.  At least that's what we thought.  The next morning brought 30 mph winds, which was just enough to flow through the run and up through the decking, lifting the drum tight tarp.  A simple fix of over the top braces fixed that, but there's nothing like playing in 15' wind chills.  So there, we were done with THAT project. 


Apparently, the large screen television heard THAT proclamation and decided it wanted attention.  Either that or after 8 years, and 5 moves, it simply decided that it had had enough Being the week past black Friday, there were still deals (minus the crowds) to be had.  As long as the TV was being replaced, the stand it was on, also 8 years old (and now held together with glue and "L" brackets) may as well be replaced.  And the sofa that started falling apart the day of delivery 2.5 years ago (don't get me started on THAT story) had to go.  Luckily, the local furniture store was having a major end of the year sale as well. 

Huh, as long as the room was now EMPTY, wouldn't this be THE best time EVER to take down the nasty window blinds, caulk the window and door casement, and PAINT the whole ROOM?!  WHY SURE!!!  The old room had pink sand walls, and wide, faux wood slat blinds.  The ceiling fan had horrible halogen bulbs, and was chrome and black lacquer blades.  I replaced that with an BRIGHT LED pod!  And with that... whoosh..... the project was off and running!
The whole house is Shaker style, with a bit of Prairie mixed in
with antiques and implements.  I've tried to keep it simple and
clean.  The kitchen is full of old kitchen tools. The Den is
full of farm tools.

The paint color is a Valspar paint, a dusty bright blue called Blue Vault.
Check out the Denise Whitehead print of the cow! I love her stuff. 
I have her roosters in the kitchen.

I found the antique shaker chair for
$5 at a yard sale and rewove the seat.
I love the1930s shoes.


So in 10 days, we bought the new TV, picked out new furniture, waited for delivery and purchased new décor, painted the room and decorated.  Phew.  Where did this project get old?  Oh, about the second dip of brush into paint can while cutting in the trim.  But I DID finish and it looks FABULOUS!  It was the last finished room in this house that hadn't been made mine! Now it belongs. 


I stripped patchwork printed fabric 2"wide and made a new, usable, seat for the shaker chair.  I made a shaker rack and hung it on the wall, where is belongs.  On top of the pie safe, which came across the Oregon trail and is signed 1882 on the back with family information, is my old 1885 7 day clock.  The columns of which have a new coat of navy blue paint.

I came across this 1915s Ohio star quilt in blue and red mattress
Ticking fabrics for $60! It only has two tiny seam pulls, which
I have already fixed.  I plan to use it as a throw.
So, not bad for a 10 day project!

Monday, December 21, 2015

Where on EARTH does the Time go?

I'm going to need to set up some kind of email alert to remind me to take a break and crawl in here and post!  I piled a bunch of photos into the laptop's drive and then just never sat down to organize electrons and hit ENTER.  So for that, I apologize.
 
The past five WARM weeks have been filled with project after project. 


The grand surf session of a project always begins with a wave of cleaning.  (Isn't that always the way?). Anyway, while cleaning out my studio desk in preparation for an upcoming portrait painting session, I decided my fountain pens needed a home.  I didn't want to keep them vertically in a cup.  Rather I wanted to display them and keep them ready at hand.  For that I would need a wall mounted display.  I searched and searched.  There is no such thing.  So I'd have to build one.  I purchased a ready made and routed plaque at a hobby store and a bag of mini shaker pegs.  I drilled the holes, added a bit of glue, pushed in the pegs, grabbed my can of spray paint, and hung my creation on the wall.  It turned out well, if I do say so myself.  :D
 

Of course that required a quick purchase of some new inks.
I purchased some bottles of  Lavender ink.  I HIGHY, HIGHLY recommend them.  The flow is smooth.  The bottles are classic inkwell shape, plus have a filling well inside the opening.  The colors are also intense and there are a wide range of them.  As you can see, I have a few blank spaces on my hanger.  I treated myself to a Hammered Green Esterbrook SJ fountain pen, which took care of one space.  The other one was GOING to be filled by a mother of pearl dip pen with a gold nibs from 1885, but the seller failed to mention the highly cracked, irreplaceable nibs.  So back it went.  So one place is still open.  Just in case I find something wonderful. 

My little corner of the world.  It is an antique school master's desk.  In the daytime I can see clear down the valley to the lake.  I love working here and watching the cattle and chickens.
 
 
As long as I was working in the shop, I decided to make a little shelf for my antique egg scale and get it out of my way and free up the counter space.  It looks adorable next to the wall mounted egg skelter, and is still functional!
 
 
As you can see, November brought us another nasty little surprise. ICE.  A week before Thanksgiving we had an ice storm.  And what an ice storm it was.  Thanksgiving we received an inch of ice and then 5.5 inches of very wet snow.  Luckily, it was gone as fast as it came.  Although, the deeper areas of blown snow did manage to hold on for over 10 days.

 
Thanksgiving was WONDERFUL!  Sensitive people avert your eyes.  We gave the turkey carcass to the hens.  They looked at each other, did a quick head count, decided it was no one they knew and tore into a protein laden meal!
 
Yes, chickens are omnivores.  There is NO such thing as a healthy vegan chicken.  They need protein and LOTS of it!  Especially during and after the molting season.  And Boy oh BOY did we have a molting season.  Most of the girls melted before the great chill, but two of them have just started.  Naked necks, and naked chicken butts in the cold, late December breeze.  I feel sorry for them.


At the beginning of December I came up on another project.  Well, a project for Doc.  I picked up an old hand cultivator for only 20$.  Besides the rotten handles, it was in great condition.  I had planned to place it on the front lawn or on the porch.  Did I mention the rotten wood handles?  Well while placing it in the truck, I snapped one in half.  Actually, it fell apart in my hands.  I challenged Doc to make me a new pair of handles from scrap lumber.  I only meant for him to match the curves so I could bolt it back together.  Not only did he match the curve, but he contoured the grips and tapered the ends and sanded! I drilled the bolt holes, bought new bolts, sealed the handles in glossy red paint and placed the finished project out for everyone to enjoy.


Pretty cool, eh?
 
So all of that pulled us full into the month of December.  Which only brings MORE projects!